Archives November 2021

How to resolve issue with 3CX Tunnel ON 3CX PBX and 3CX Softphone (TNL)

Check the following things :

  • Check your Softphone Settings (Steps Below).
  • Check if you are able to ping the PBX server from LAN and outside LAN (Google How to ping a server from CMD/Terminal).
  • Check your PBX settings (steps Below).
  • Check your Internet connectivity.
  • Check if any VPN/Firewall is blocking the services.

How to check 3cx Softphone Settings :

  1. Match if the 3cx Secure tunnel password and the username and password all match in your softphone to PBX.
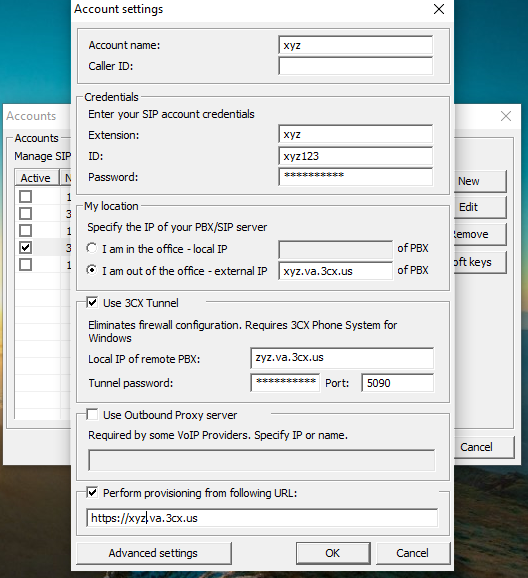
    1. How to check if the username and password match in 3cx Softphone App :
      • Go to your softphone and open the Account Settings
      • Now click on the account you want to check and click on edit
        • In case there is no profile please create a new profile on the softphone app.
        • Now See if the Use 3cx Tunnel Option is Checked and match the passwords from here to your PBX.
        • 3cx Softphone

How to check 3cx PBX Settings :

  1. Match if the 3cx Secure tunnel password and the username and password all match in your PBX to Softphone.
    1. How to check if the username and password match in 3cx PBX .
      • Go to your 3cx PBX admin login page and open the main menu from the left had side of the screen with 3 vertical bars if not already opened.
      • PBX Menu
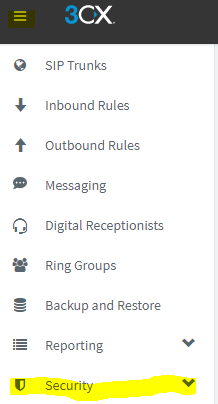
      • Now click on the Security Dropdown menu :
      • 3cx Security TAB
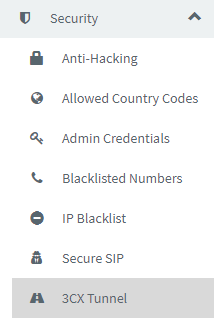
      • Here you will See the 3CX Tunnel Option. Click on it to open the settings.
      • 3cx tunnel
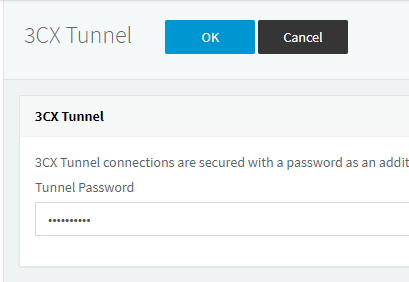
      • This is your 3cx Tunnel Password which is different from your App username password.
      • Copy this and match it from your softphone.
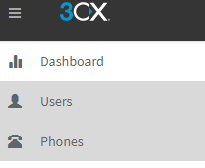
    2. Now Go to your PBX Main menu again from the left hand side and go to the users menu for configuring 3cx softphone settings.
      • 3cx phone menu
      • Now from the users menu open the extension you want to edit
        • 3cx ext
      • Now when the extension is opened go to phone provisioning tab
        • 3cx phone provisioning
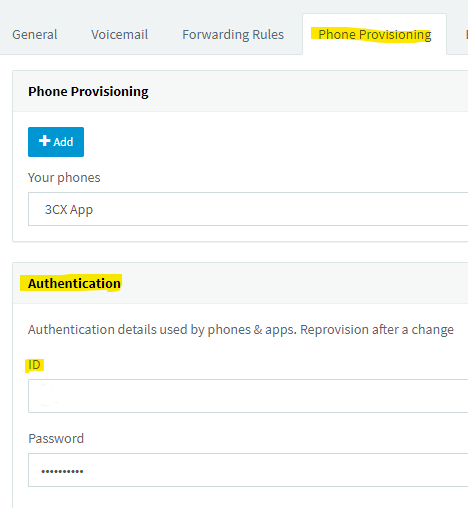
        • Under the Authentication TAB is where you will Find your 3cx APP username and password.
        • Match This from your softphone
      • Now Go to the Options TAB
        • 3cx PBX
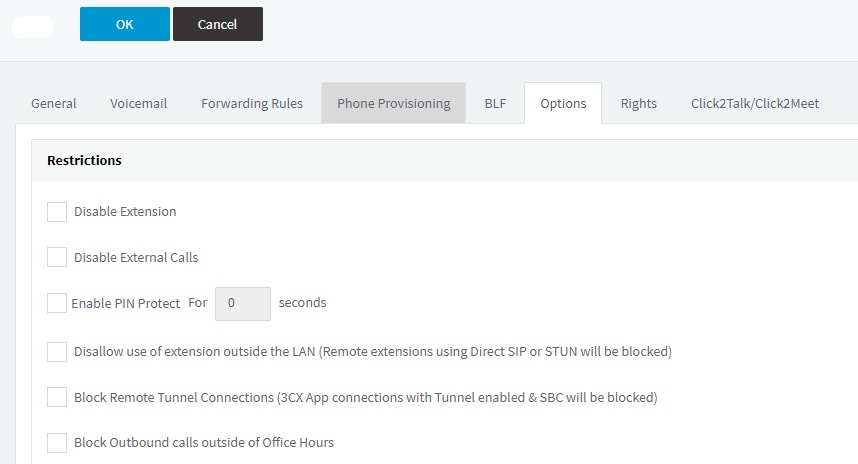
        • Now in this Tab Check if the option Block Remote Tunnel Connections has been unchecked
        • Also if the the extension is not disabled
        • And if you are using the softphone outside the PBX local network then please check if the Disallow use of extension outside the LAN option is also unchecked

Downloads and links :

Download 3cx PBX from : https://www.3cx.com/pbx/

Download 3cx Softphone from : :https://www.3cx.com/voip/softphone/

You can Also find other config for Desk phones here : https://www.3cx.com/blog/voip-howto/configuring-sip-phone-as-tunnelled-external-extension/

We are using a cloud hosted Environment with and 3cx softphone app in the above case study.

Contact us or your network admin in case you require any more help.

Basics of SIP over UDP, TCP, & TLS

Sip Over UDP, TCP, & TLS (The Transport Layer’s)

Are your SIP calls transmitted securely? To find out, check how your calls are being transported. There are three common protocols used in SIP: UDP, TCP, and TLS. Each protocol has a use-case, which don’t always include security as a priority. Let’s take a deeper look at the differences between these three SIP protocols.  

User Datagram Protocol (UDP)

UDP, or user datagram protocol, is the default layer for VoIP applications because of its excellent delivery speeds. This protocol provides only the essentials needed to transport voice and media messages, rapidly and efficiently moving these packets between hosts. UDP is good for speed and efficiency. 

How Does UDP Work? 

  1. Gathers data, adding unique header information to the packet. Data consists of origination and termination ports, packet length, and checksum. 
  2. UDP packets (datagrams) are condensed into IP packets and moved to their destination.

Transport Control Protocol (TCP)

TCP, or transport control protocol, provides users with reliable voice and messaging delivery across the Internet. This protocol is responsible for delivering the packets in a specific order, regardless of how long it takes. TCP is great for reliable packet delivery. 

How Does TCP Work? 

Configuring TCP uses a three-way handshake between the client and a server. It’s composed of three messages that enable endpoints to synchronize (SYN) and acknowledge (ACK) each connection property, including port addresses.

  1. The client selects a sequence number (SYN).
  2. The server selects its own sequence number and acknowledges the clients’ sequence number (SYN/ACK).
  3. The client acknowledges the server’s number (ACK).

Transport Layer Security (TLS)

TLS, or transport layer security, protocol is the top and most powerful layer responsible for securing SIP voice and media messages. This protocol uses cryptographic encryption to provide end-to-end security. TLS is best for encryption, authentication, data integrity, and secure SIP trunking in general. 

How Does TLS Work? 

Like TCP, TLS begins with a handshake:

  1. The protocol initiates parties to negotiate a shared encrypted key code between the client and server.
  2. It permits both endpoints to authenticate themselves and verify who they say they are.
  3. With its own framing mechanism, the protocol inscribes each message with an authentication code to ensure message integrity and authenticity.

SIP Common Method Of Attacks

SIP Security Threats: Common Methods of Attack

Because SIP trunking requires an Internet connection, your business phone systems may be more susceptible to cyberattacks. Below are some examples of common SIP threats you could be vulnerable to without enhanced network security. 

  • Spoofing. Scammers spoof – or impersonate IP addresses by “sniffing” data packets – business numbers to make unauthorized calls and gain access to critical information used for fraudulent activities. 
  • Call Flooding. Attackers spoof a network user, flooding the phone system with calls so legitimate callers are unable to reach the organization. 
  • Eavesdropping. The act of intercepting personal or confidential communications over the Internet without consent to obtain sensitive information.
  • SIP Modification Attack. Hackers tamper with signals, call flows, key codes, and more to compromise data integrity. 
  • DoS/DDoS. Denial of service and distributed denial of service attacks send so much malicious traffic to a network that it can no longer communicate properly, preventing legitimate calls from getting through. 
  • Spam. Hackers targeting callers with robocalls and phony requests.
  • Phishing. Like spam, these attacks prey on vulnerable users to get sensitive and personal information as if they were coming from a trusted source.
  • Toll Fraud. Attackers artificially rack up expensive toll charges from international numbers on lines outside an organization’s phone system, taking a cut of revenue generated from the calls.

Best Practices for Secure SIP Calling

  1. Regular system updates. Applying system updates to your operating systems can help protect your network from exploitation and malicious attacks. 
  2. Use a VPN. Many companies set up their VoIP platforms on a Virtual Private Network (VPN) to protect their traffic regardless of where their teams are located. VPNs automatically encrypt traffic, providing businesses a higher level of security than a simple at-home WiFi network. 
  3. Setup Firewalls. A barrier against untrustworthy networks, firewalls protect your network from specific traffic based on your security parameters. 
  4. Examine Call Logs. Review the company’s call logs to track any unusual call behavior. You can monitor your call volume in a variety of views using a call analytics dashboard. 
  5. Establish Security Best Practices. Implement routine security training for all employees and encourage them to report suspicious behavior.

Twilio Guides and Solutions for Error 32205 GEO LOCATION

How TO Fix GEO LOCATION ERROR 32205 in Twilio SIP Trunk


  1. Steps to follow :
  2. Login to your twilio root account at https://console.twilio.com/
  3. Now from the Left hand Side Menu.
  4. Click on Monitor.
  5. Click on Logs.
  6. Click on Errors.
  7. now click On Error Logs.
  8. Choose your LOG duration to see old errors.
  9. Here you will find the error like in the screenshot Below on the right hand side of the screen.
  10. Click on the error.
  11. Continue by scrolling below for further steps.


Screenshot of the Error

Screenshot OF Error

Details of the error and link to fix it after you have clicked on the error

Error Details

Troubleshooting steps continued :

10. Now on the right hand side on the Column : Message – you can read that why the call was blocked and for what region the call belong to.

The Line is : No International Permission. To call this phone number you must enable the Low Risk permission for PE at https://www.twilio.com/console/voice/calls/geo-permissions/low-risk?countryIsoCode=PE and try again.

A. No International Permission – Means its an international call from our country and calls to this country are not permitted

B. The second part of the error tells us that to enable call to this country we must enable low risk permission for country code PE – Peru

C. You can check country codes from the following link : https://www.iban.com/country-codes.

D. Low Risk permission may cause extra charges on you current call rate.

E. The next part is to copy the link from Https:// to countryIsoCode=PE

11. So copy the complete link and open in a new window in your browser

Examle : https://www.twilio.com/console/voice/calls/geo-permissions/low-risk?countryIsoCode=PE

12. Continued Below after the next image

Troubleshooting steps continued :

13. By opening the link we can see the Price per minute for the Country in USD or the default currency of your choice, The country Phone code like here in our example Peru phone code is +51 like for US it’s +1.

14. Now on the right hand side select the the check box deselect continent and click on save. Your issue should be resolved.

15 if your issue is not resolved enable the High risk Profile by going back the above link and from the above screenshot choose the high risk tab and follow step 14.

16. Still not resolved please mail us or open a case with twilio as per your support plan.

17. You can read about this more in the following Guide on Twilio’s Official website :

https://www.twilio.com/docs/sip-trunking/voice-dialing-geographic-permissions